FAQ

Frequently asked questions
![]() Start
Start ![]() Pro
Pro
This page shows general procedures that are not directly attributable to a specific function, as these already have a separate page. We provide tips for building the 3D model so that it can be processed smoothly by Para-Flex and underlying production software.
The information will be expanded further in the coming period.
What is the Support Mode in Para-Flex?
Support Mode provides additional functionality in Para-Flex. This gives users and our support team more information about the current 3D model than is normally displayed. It also includes troubleshooting features. In most cases, Para-Flex support will activate this mode for the user as needed. Please contact us if you would like to receive more information.
Can I rotate a panel for CNC processing?
 In Support Mode (see above) Para-Flex offers a function called Rotate 180 degrees. The button for this will be visible on the Shop Floor toobar, and rotates the selected parts from back to front before generating the STEP files for the CNC process. Meaning that the top becomes the bottom and vice versa. By default, the top surface is determined by the part’s extrusion direction. More information about the top or bottom side of a panel, and how to recognize, can be found in the Basics-section.
The rotation switch can only be applied to parts linked to the process of CNC. On top of that, the status of this switch is saved in the part properties, so switching off cutting or CNC processes won’t delete this preset.
Can I copy my Data Grid settings to a colleague or other PC?
The settings for the Data Grid view (known as Tree Layout) are saved upon closing Para-Flex. If changes are made to the 3D model or the Para-Flex data, this layout will be reset to the previously saved status. We therefore recommend restarting Para-Flex after making changes to the Data Grid view.
The Tree Layout settings are stored in a XML file (“Tree Layout.xml”) at the following location: C:\Users\*Username*\AppData\Roaming\DynfosAddIn\ParaFlex\Layout.
The Tree Layout settings are stored in an XML file at the following location:
This file can be copied or backed up. However, be careful in copying this file to another PC, as the file also preserves the monitor settings. If there is a difference in resolution, scaling, or position (left or right), it may cause problems with the display of windows and pop-ups.
In any case, make a backup if you overwrite this file.
How to update or check my Para-Flex license type?
The functionality of Para-Flex depends on the license you are using. This could be Start, Pro, or CAM, for example, and is displayed in the top bar of the program. The differences between licenses can be found here.
Fixing license issues
If Para-Flex behaves differently than expected (for example, no drilling buttons or no material texture updates), check the license type you are using. In some cases, after updating or reinstalling the program, you will need to manually place the license file in the correct folder.
Copying the license file
The files will be provided by your Para-Flex distributor. License files are assigned by Hostname (PC name), so be sure to copy the correct license to the correct PC. The PC’s hostname is included in the zip file’s filename. This should match the hostname (PC name) of the PC.
Example of the zip file: OKE2027LTEx_CompanyName.HostName.zip
The OKEParaflex file is located in this zip file, named OKEParaflex.lic
The file ‘OKEParaflex.lic’ should be copied to: C:\Program Files\IronCAD\*IronCAD Version*\bin\DynfosAddin\Common
Existing licenses may be overwritten.
If the license is working properly, the top bar of the program will display “Para-Flex CAM” or “Para-Flex Pro”.
Settings: Pro Integration switch
If the license is setup correctly, but Pro functionallity is still not available, please check your settings as discribed below.
How and why to enable Pro integration in PF Settings?
If Para-Flex behaves differently than expected (for example, no drilling buttons or no material texture updates), and the license is setup correctly (Pro or CAM), it is possible that in the Settings section ‘Pro Integration’ is switched off.
- Check the used licence (displayed in the top bar of the program):

- To switch on all Pro functionalities, go to Options > Settings and look for Enable Para-Flex Pro integration on the Para-Flex tab:
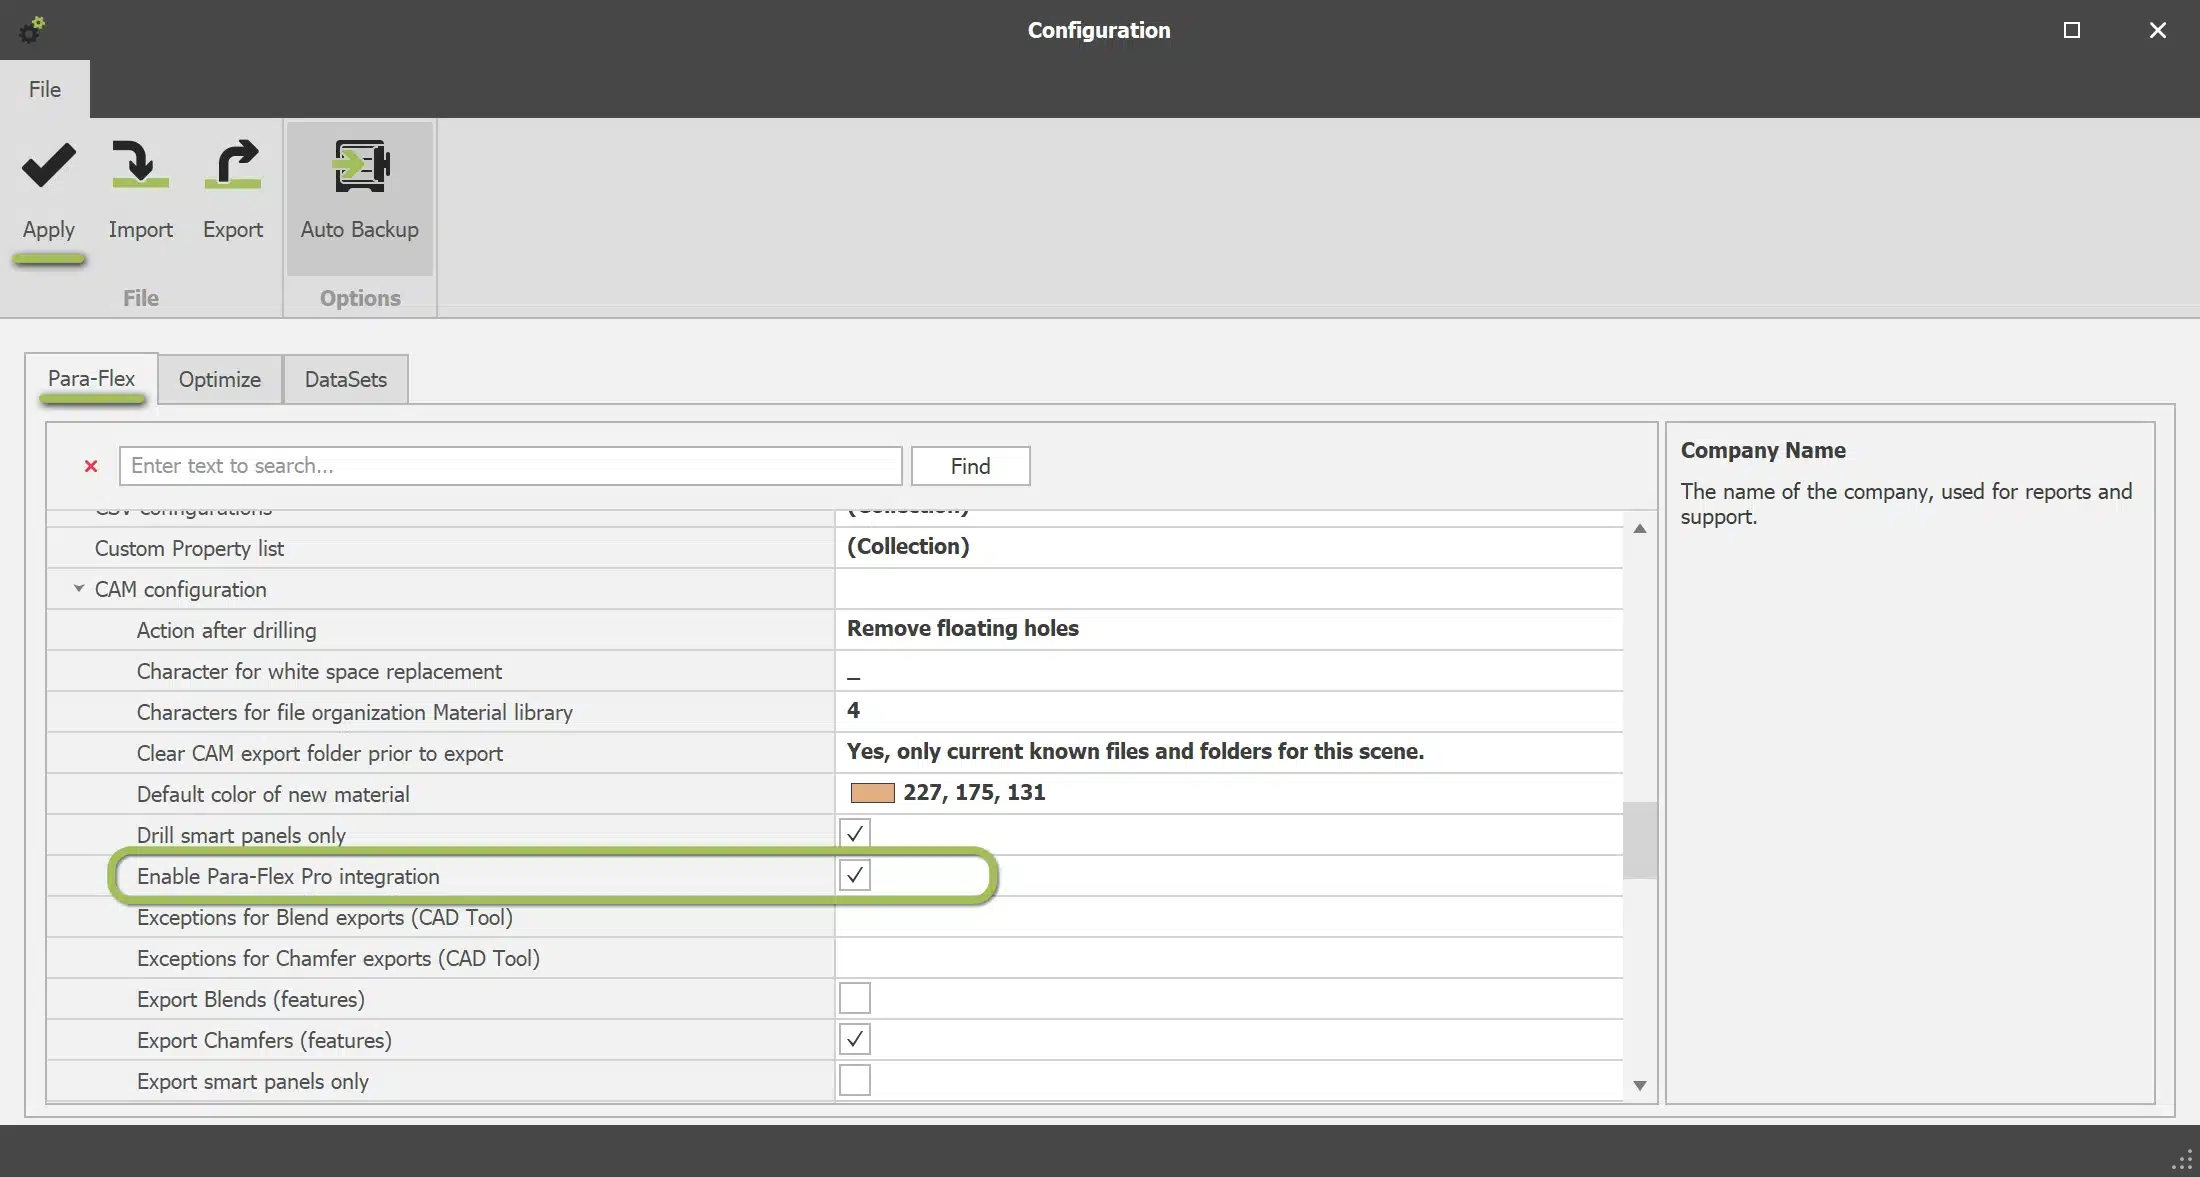
After changing a setting, first click Apply to save the modifications, and restart Para-Flex.
If Para-Flex still doesn’t provide the Pro or CAM features, feel free to contact the support desk.
How should I draw a rabbet or rebate and cut-outs?
Rabbet joints and cut outs can be drawn as desired in IronCAD, the result of the drawn shapes will be sent to the CNC program. To create clean rabbet cuts it is useful to draw the cut out shape slightly bigger than the edges of the panel, for example using the offset function in the Cross Section of the shape.
In the example below, the cut-out shape is drawn in such a way that it extends 2 mm beyond the edges of the panel.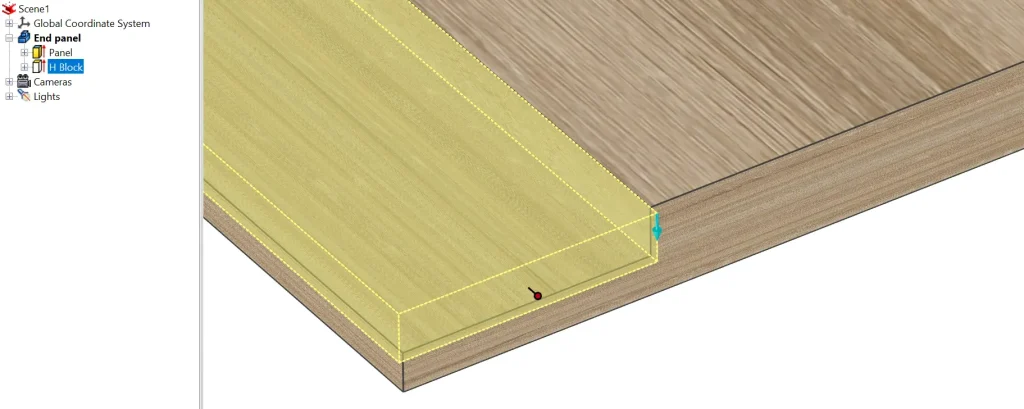
What are the possibilties to handle Overlength in Para-Flex?
There are many ways to add overlength to an item handled by Para-Flex, please read the possibilities below.
Using Edge banding functionality to add overlength per edge
The…
Setting an overlength value for edge banding material (Settings)
When calculating the length of edging, the Optimizer can also account for extra length on each side. This allows the required length of edging to be better matched to the actual dimensions.
Go to Options > Settings > Tab ‘Optimize’ and look for ‘Edgeband Fixed Overlength’
Adding a default overlength value to each item (Settings)
Para-Flex can be configured to take an excess margin into account when calculating the cutting dimensions of each part. This feature can also be enabled based on the minimum dimensions (length and width) or the minimum surface area of the part.
Go to Options > Settings > Tab ‘Para-Flex’ and look for ‘Fixed overdimensions for parts (mm)’
Adding overlength values to a selected item (Property Grid)
The…
Setting a default overlength to laminate items (Settings)
The…
Tip: Using Net or Gross values in exports and Optimize
The…
Tip: Using Overlengt in combination with CAM Export
The…